In recent years, I had repeatedly considered setting up a Home Assistant instance to bring together the many loose ends of my smart home landscape. In addition to the Fritz!Box with thermostats and a few switches, the boiler also has connectivity, and then there are a few things from Ikea, and the roller blinds can also be controlled remotely.
Matter was initially still an option I wanted to wait for. Wait until it was finally no longer criticised by heise and Co. It is obviously difficult to create a solution that can communicate with everything.
That said, Home Assistant can already communicate with everything, regardless of the protocol. I had concerns about the effort involved and kept putting it off. Now I had the time and set up a proper instance that can do a lot and has a dashboard that’s decent enough so far.
The sticking point in the recent past was that the scope of my Home Assistant instance was pushing the Raspberry Pi to its limits. It’s only a Pi 4 with 2GB of RAM. It does have an SSD via USB 3, but overall, it’s not exactly world-class.
My first thought was a Raspberry Pi 5 with 4, if not 8 GB of RAM. But that’s easily 100 euros, at least for now. With RAM prices currently on the rise, that may soon change.
You also need cooling, a case, a power supply and possibly decent storage on top. Where does that end up price-wise?
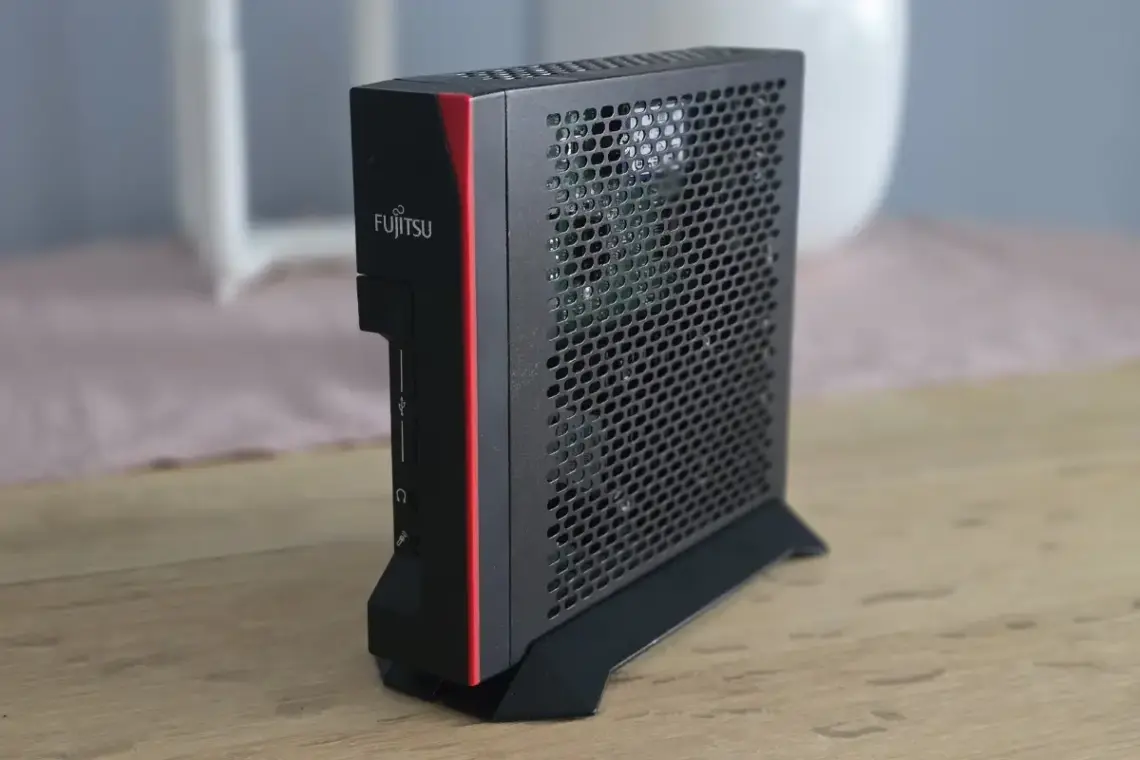
I decided not to bother finding out after remembering an article on heise.de that praised a thin client for being so versatile and inexpensive.
At the time, heise quoted around 70 euros, but shortly after the article was published, prices rose slightly. I just managed to get one for 45 euros on Kleinanzeigen, with a new SSD for another 15 euros. The built-in 4GB RAM is enough for me for now. I no longer have to worry about the case, cooling and power supply, and the Futro’s power consumption is also slightly lower than that of the Pi 5. So far, so good!
When the Futro was on its way to me, I noticed online that it’s not as easy to install Home Assistant on it as it is on the Pi.
Problems may arise with the hard drive, as it may not be recognised by the BIOS or may not be bootable.
But it’s not that serious if you’re not afraid of Live Linux and a little bit of terminal work. Below, I’ll try to summarise how I got it set up in no time.
Installing Home Assistant on Futro S740
Prerequisites
USB stick (FAT32 formatted) for BIOS update
USB stick for Linux Live system
Internet connection, of course
Part 1: BIOS update
Why is this necessary?
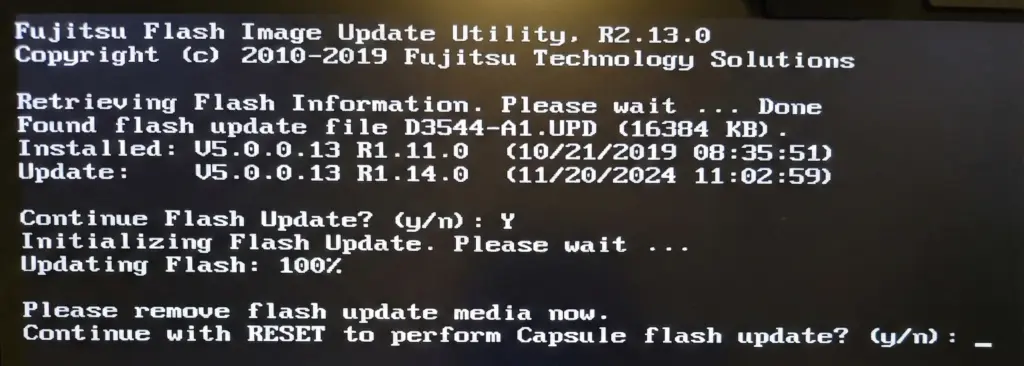
Older BIOS versions have problems with UEFI booting from the internal SSD. After installing HAOS, the SSD is often not recognised as a boot option. Updating to at least R1.13.0 or newer fixes this problem.
Download: You can find Admin Pack V5.0.0.13 – R1.14.0 here:
https://support.ts.fujitsu.com/IndexDownload.asp?SoftwareGuid=FA0A6053-4D47-4C28-93A3-021C2E530D93Found via R3NE07 – Also a good reference for the device in general!
Procedure
1. Download and unzip the ZIP file
2. Format the USB stick to FAT32
3. Copy the contents of the ZIP file directly to the root directory of the stick (not the folder, but the files!)
4. Start Futro → press F12 → select USB stick, displayed as ‘FUJITSU Update Utility’
5. Confirm update with Y
6. After ‘Updating Flash: 100%’, remove USB stick
7. Confirm Capsule Flash Update with Y
8. Wait for restart
Part 2: Preparing the Linux live system
You can use Ubuntu Desktop or another Ubuntu-based distribution.
Ubuntu Desktop: https://ubuntu.com/download/desktop
Linux Mint: https://www.linuxmint.com/download.php
Write the ISO to the stick using Balena Etcher.
Booting
1. Insert the USB stick
2. Start Futro → F12 → Select USB stick (UEFI)
3. Select ‘Try Ubuntu’ (do not install!)
Part 3: Writing HAOS to internal SSD
Open the terminal and download HAOS. You may want to set the keyboard layout to your preferred language in the settings first.
cd ~/Downloadswget https://github.com/home-assistant/operating-system/releases/download/17.0/haos_generic-x86-64-17.0.img.xzThere may already be a more recent version available, which you can find here.
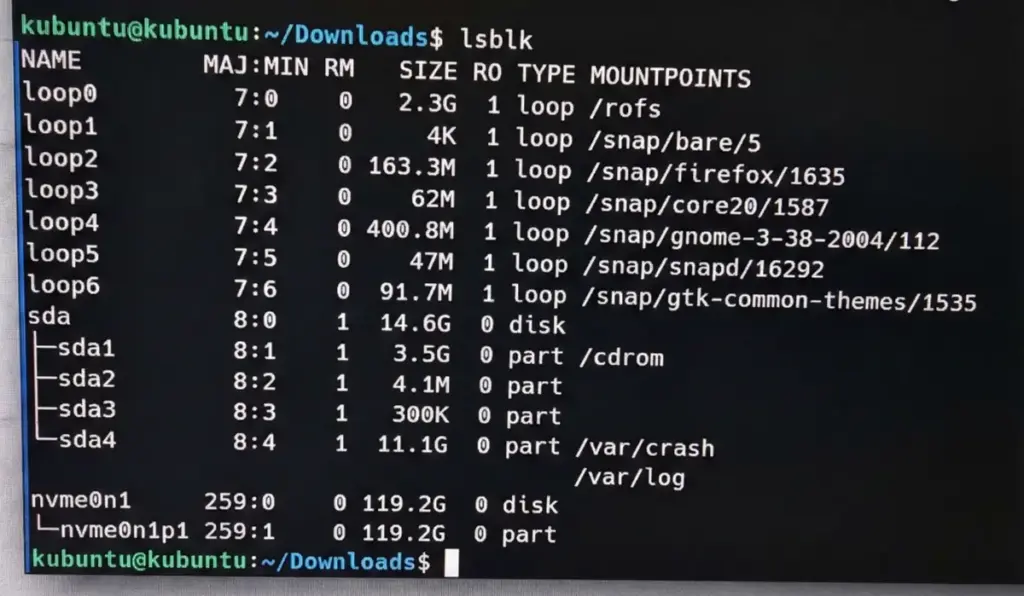
Then, identify the internal SSD:
lsblkTypical output:
– NVMe SSD: `/dev/nvme0n1`
– SATA SSD: `/dev/sda`
Be careful not to accidentally overwrite the USB stick! The internal SSD of the Futro will be nvme0n1, as it is in my case.
Write HAOS to SSD
NVMe SSD:
xzcat haos_generic-x86-64-17.0.img.xz | sudo dd of=/dev/nvme0n1 bs=4M status=progresssudo syncSATA SSD (`/dev/sda`):
xzcat haos_generic-x86-64-17.0.img.xz | sudo dd of=/dev/sda bs=4M status=progresssudo syncIf the version of HAOS has changed, the command must of course be adjusted. You can also simply rename the download to haos.img.xz.
The most important thing: Create an EFI boot entry
NVMe SSD:
sudo efibootmgr --create --disk /dev/nvme0n1 --part 1 --label "HAOS" --loader 'EFIBOOTbootx64.efi'SATA SSD:
sudo efibootmgr --create --disk /dev/sda --part 1 --label "HAOS" --loader 'EFIBOOTbootx64.efi'Part 4: First start
1. Shut down Linux
2. Remove the USB stick
3. Start Futro
The machine will work away for a while. If, like me, you still have the Futro connected to a monitor, you can follow the progress on screen.
The first start takes 5–20 minutes. During this time, the partition is expanded to the full SSD size and Home Assistant Core is downloaded.
As soon as you see the Home Assistant terminal start screen, you should also start to see something at http://homeassistant.local:8123.
Part 5: Restore backup (optional)
If you have an existing Home Assistant backup:
1. Select ‘Restore from backup’ on the onboarding screen
2. Upload the .tar backup file
3. All settings, automations and integrations will be restored
Conclusion
Really, it’s no big deal. The most important thing is to write the EFI boot entry. In the BIOS settings, you need to make sure that Secure Boot is off and UEFI Boot is on. That was already the case for me.
Sources
1. Home Assistant Installation Generic x86-64
2. GitHub Issue – Boot-Problem Fujitsu/SATA
Leave a Reply